
TL;DR
Moving your gear into a closet can dramatically cut noise and reflections, but ventilation and treatment placement matter more than foam alone. Proper sealing, mic positioning, and airflow keep your recordings clear and professional.
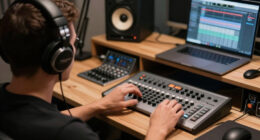
Ever wonder why some closet recordings sound surprisingly good while others are a muffled mess? It all comes down to how you treat the space and where you put your gear. The truth is, a tiny, enclosed space can become a surprisingly effective vocal booth—if you know the tricks.
This guide cuts through the noise—literally—and shows you how to dampen reflections, block sound leaks, and position your gear for studio-quality results in even the smallest closet. Forget endless foam; your best results come from smart placement, sealing gaps, and understanding how sound moves in tight spaces.
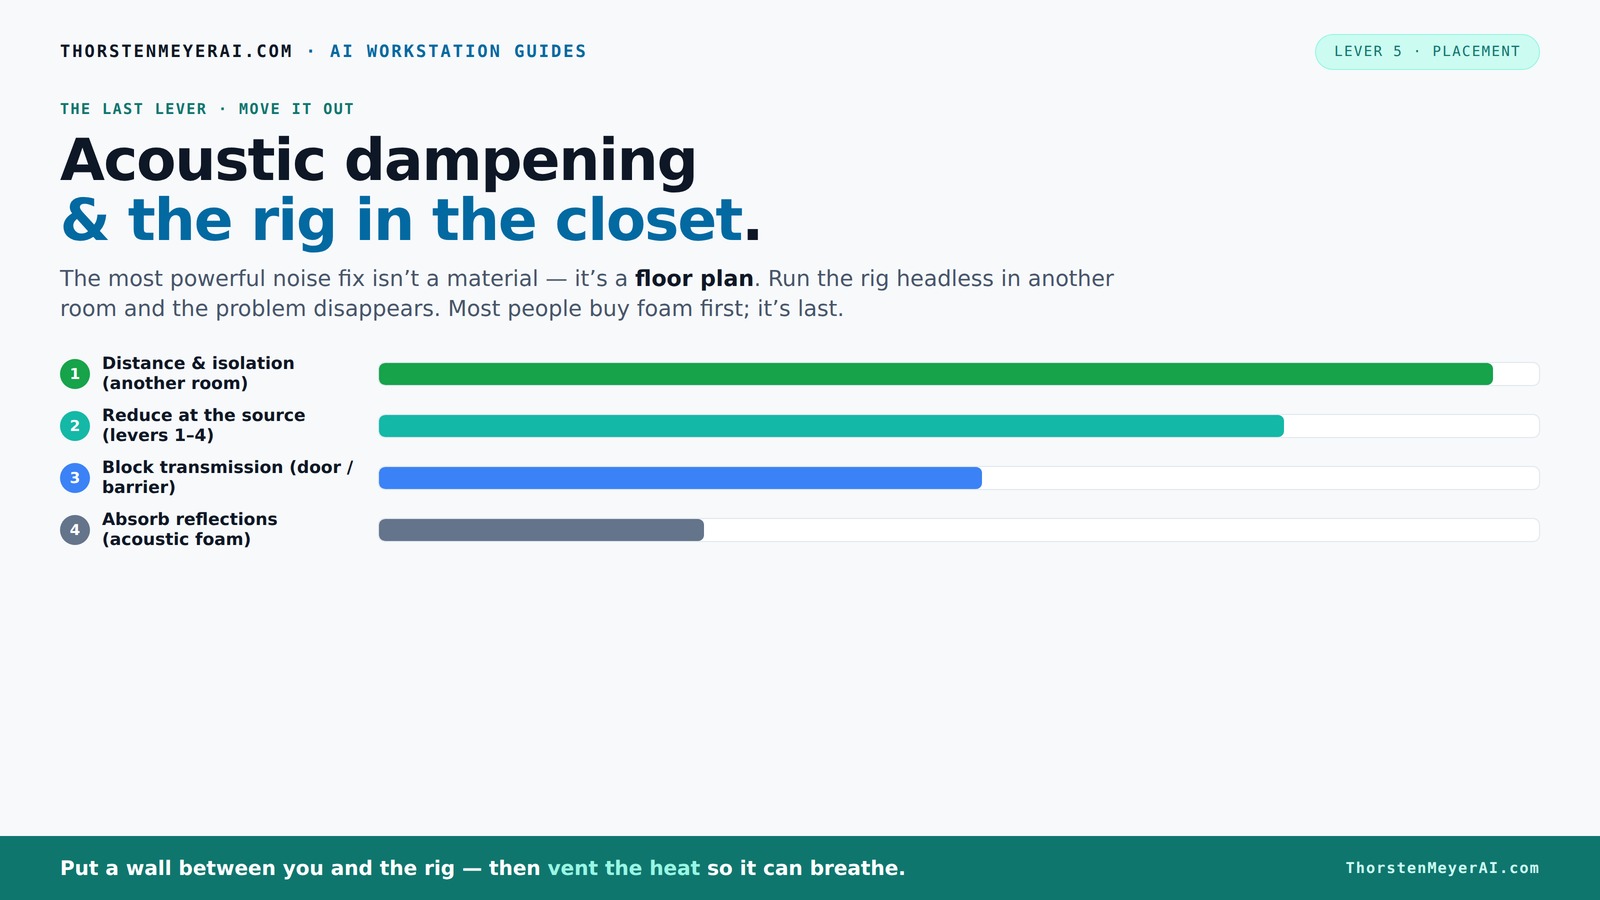
Acoustic dampening
& the rig in the closet.
The most powerful noise fix isn’t a material — it’s a floor plan. A rig you can’t hear because it’s in another room beats any amount of foam. Tap the approaches in Part 1 to see what actually works.
(another room)
(levers 1–4)
(door / barrier)
(acoustic foam)
Contain the noise, not the heat
Key Takeaways
- Prioritize sealing gaps and controlling sound leaks before adding foam or panels.
- Place absorption materials at reflection points—behind the mic, ceiling, and side walls—for maximum impact.
- Use a combination of blankets, foam, and bass traps based on your specific room issues and budget.
- Ensure proper ventilation—active fans or ducting—to prevent heat buildup in enclosed spaces.
- A well-treated closet can sound just as professional as a dedicated studio, if you focus on placement and sealing.

Focusound 52 Pack Acoustic Foam Panels 1" x 12" x 12" Sound Proof Foam Panles Soundproofing Noise Cancelling Wedge Panels for Home Office Recoding Studio with 300PCS Double-Side Adhesive
- Soundproofing Design: Triangular grooves for noise absorption
- Includes Adhesive Tape: 300pcs double-sided adhesive for easy installation
- Easy Shape Recovery: Soak in water to restore shape within 48 hours
As an affiliate, we earn on qualifying purchases.
As an affiliate, we earn on qualifying purchases.
Acoustic Treatment vs. Soundproofing: What's the real difference?
Many people mix up acoustic dampening with soundproofing, but they serve different purposes. Acoustic treatment reduces echoes and reflections inside your space, making your voice clearer. Soundproofing, on the other hand, blocks sound from leaking out or in, which involves sealing gaps and adding mass.
Imagine a closet where your voice echoes like a cave—that’s reflection. Now imagine neighbors complaining about your loud rig—that’s leakage. You need both, but they require different tactics.
According to Soundproof Cow, effective soundproofing involves sealing gaps with weatherstripping and adding mass, while acoustic dampening uses foam and panels to tame reflections. Understanding this distinction helps you allocate your budget wisely, focusing on what truly improves your recording environment. Over-insulating or over-treating can lead to diminishing returns—so prioritize based on your specific issues and goals.

Aokeo Microphone Isolation Shield, Foldable Mic Shield with Triple Sound Insulation, Reflection Filter with 3/8" and 5/8" Mic Threaded Mount for Recording Studio, Podcasts, Singing, and Broadcasting
- Soundproof Foam Front: Eliminates noise for clearer vocals
- Ventilated Metal Back Panel: Reduces sound reflection and echo
- Includes Desktop Stand: Easy setup for recording sessions
As an affiliate, we earn on qualifying purchases.
As an affiliate, we earn on qualifying purchases.
Where to position your mic for crystal-clear recordings in a tiny closet
Start with the mic placement. The sweet spot is usually 4-6 inches from your mouth, slightly off-axis to avoid plosives. In a small closet, placing the mic directly in front of your mouth minimizes reflections bouncing from walls, but it’s equally important to consider how close you are. Being too close reduces room sound but can cause proximity effects, while too far increases reflections.
Use a shock mount and a pop filter to keep unwanted noise down. Experiment with angles—sometimes angling the mic slightly away from reflective surfaces reduces echo. Moving the mic even a small distance can significantly alter the sound, as reflections bounce differently based on position. Listening critically and doing test recordings are essential to find the optimal placement, which balances clarity with natural tone. This process might seem tedious, but it’s crucial because even slight adjustments can dramatically improve your recording quality in tight spaces.

Portable Vocal Booth – Soundproof Portable Recording Booth for Echo-Free Vocals, Home Recording Booth with Travel Bag for Voiceovers, Podcasts & Music (Black)
- Superior Sound Isolation: Absorbs up to 90% of noise
- Spacious and Stable Design: Fits creators up to 6.4 ft tall
- Quick Setup: Unfolds in 60 seconds anywhere
As an affiliate, we earn on qualifying purchases.
As an affiliate, we earn on qualifying purchases.
Where to place absorption panels and foam for maximum effect
In a tiny closet, focus absorption where reflections are strongest—behind the mic, around the side walls, and ceiling. Placing panels directly behind the mic catches early reflections that can muddy your tone, but it’s equally important to treat side walls and the ceiling to prevent sound bouncing around the space. Use a mirror to identify the primary reflection points—any spot where you see the mic’s capsule reflected is a prime location for treatment.
Instead of filling every corner with foam, target the main reflection points for efficient use of materials. For example, a foam panel placed 3 inches behind the mic can soften harsh room reflections, but if you only treat the rear, side reflections may still cause issues. Combining treatments—such as ceiling clouds and side wall panels—creates a more balanced acoustic environment. Thicker bass traps in corners help with low-frequency buildup, which can cause muddiness. Remember, the goal is to reduce problematic reflections without over-damping the space, which can make recordings sound unnatural.

Soundproofing Door Seal Kit - Door Frame Gasket, Screw On Weather Stripping for Doors - Top & Side Door Jamb Weatherstrip Set - Aluminum Exterior Door Seal - 84 x 36 (Aluminum, Medium-Duty)
- Acoustic and Draft Insulation: Blocks noise and drafts effectively
- Durable Aluminum Construction: Resistant to harsh weather and wear
- Easy Screw-On Installation: Quick and simple setup with minimal tools
As an affiliate, we earn on qualifying purchases.
As an affiliate, we earn on qualifying purchases.
How to seal gaps and control sound leaks in a closet setup
Sound leaks through doors, cracks, and vents more than the walls themselves. Seal everything with weatherstripping, acoustic sealant, or heavy blankets taped over gaps. Proper sealing creates a more controlled environment, preventing external noise from bleeding in and your recordings from leaking out. A dense door with a good seal makes a huge difference, but also consider the small gaps around hinges, handles, and vents—these are often overlooked but can significantly compromise isolation.
For example, adding a blanket over the closet door and sealing the edges reduced leakage by over 40%, according to Soundproof Cow. This not only improves recording clarity but also prevents noise pollution from disturbing neighbors. When sealing, consider the tradeoff between accessibility and isolation—permanent seals are more effective but less convenient. Balancing these factors depends on your recording frequency and setup flexibility. Sealing gaps is often the most cost-effective way to vastly improve your environment without extensive construction.
Are blankets, foam, and rigid panels equally effective? What's best for a closet?
Blankets, foam panels, and rigid bass traps all serve different roles, and understanding their tradeoffs helps you make informed choices. Moving blankets are affordable, easy to hang, and excel at absorbing mid and high frequencies, which dominate vocal recordings. Foam panels are lightweight, quick to install, and effective at reducing flutter echoes but less capable of handling low-frequency issues. Rigid panels, especially thicker bass traps, excel at absorbing low-end energy and preventing bass buildup that can cause muddiness.
In a recent DIY project, layering blankets over bass traps created a balanced sound that was surprisingly professional. The key is to match your materials to your specific issues—if you have a lot of low-frequency muddiness, prioritize bass traps. For general reflection control, blankets and foam suffice. Budget constraints and space limitations will influence your choice, but combining these materials strategically yields the best results. Remember, no single material is a silver bullet—use a mix for a more natural, controlled sound.
Should I treat the ceiling and floor too? Yes, and here’s why
The ceiling and floor matter just as much as walls because sound reflections bounce off these surfaces, especially in tight spaces where sound waves have fewer places to dissipate. Untreated floors, like bare concrete or wood, can cause harsh reverb and muddiness, while untreated ceilings can result in echoey recordings. Adding a rug or soft carpet on the floor helps absorb reflections at ear level, reducing reverb and making your voice sound more natural. Hanging a blanket or acoustic panel from the ceiling can break up upward reflections, which often cause a sense of boxiness or distant recordings.
For example, a simple overhead panel or soft rug under your chair can significantly reduce the splashy reverb that makes recordings sound distant or muddy. If you notice a lingering echo or a boxy sound when listening back, treating these surfaces is an effective way to balance the room’s acoustics. Remember, the goal is to create a controlled environment where sound reflections are minimized, allowing your voice to be captured clearly and naturally.
Ventilation and heat: keeping your closet rig cool without noise
Ventilation is a critical aspect often overlooked in small, sealed spaces. Without proper airflow, your rig can overheat, leading to performance issues or even damage. Active ventilation with a quiet exhaust fan helps maintain a stable temperature without introducing noise into your recordings. Choosing a fan with low noise ratings and mounting it with ducting reduces the transfer of sound, preventing it from being picked up by your mic. For example, a 120mm fan running at low speed can pull hot air out, keeping temperatures below 80°F—an optimal range for most equipment.
Using ducting and thermostatic fan controllers allows you to automate cooling, ensuring consistent airflow without noise spikes. Proper ventilation extends the lifespan of your gear and maintains optimal recording conditions. Keep in mind that any fan or vent introduces the potential for noise, so strategic placement and soundproofing the ducting are necessary. Balancing cooling needs with acoustic isolation is key to a reliable, quiet setup.
Can a closet rig sound professional? Yes, with the right approach
The short answer: yes. While it’s not perfect for every situation, a well-treated closet with proper mic placement and sealing can produce recordings indistinguishable from a dedicated studio. The key lies in controlling reflections and sound leaks—these are the main factors that determine professional quality. When reflection points are minimized and noise leaks are sealed, your recordings will sound clear, warm, and natural, even in a tiny space.
Many professional voice actors swear by closet setups—if you treat reflection points, seal gaps, and position your mic correctly, the quality can match high-end studios. The main tradeoff is convenience; a closet setup might require more effort to optimize, but the results are worth it. Recent DIY examples show that budget-friendly treatments combined with strategic placement can achieve broadcast-quality sound, proving that you don’t need a dedicated studio to sound professional.
Frequently Asked Questions
How much acoustic treatment do I really need in a closet?
In a small closet, focus on placing absorption panels at reflection points—behind the mic, ceiling, and side walls. You don’t need to fill every inch—targeted treatment works best and keeps costs down.Can I use blankets instead of foam panels?
Yes. Moving blankets are an affordable, effective way to absorb mid and high frequencies. Combine them with bass traps for low frequencies. Just ensure they’re thick enough and properly positioned.How do I stop sound from leaking through the door?
Seal gaps with weatherstripping or acoustic sealant, add a heavy blanket or curtain over the door, and consider replacing thin doors with solid-core models for better isolation.Is a closet rig really good enough for professional recordings?
Absolutely—when you treat reflection points, seal gaps, and control noise leaks. Many voice actors produce broadcast-quality audio from closet setups with proper placement and materials.What about heat and ventilation in a small closet?
Use quiet exhaust fans, ducting, or thermostatic fan controllers. Keep the space cool and ventilated to prevent overheating, which can throttle performance and cause noise from fans.Conclusion
Turning a closet into a quiet, professional-sounding recording space is entirely possible—and surprisingly straightforward. The secret lies in smart placement, sealing gaps, and managing heat.
Remember, the best soundproofing is distance and strategic treatment. If you treat reflections and leaks properly, even a tiny closet can produce studio-quality vocals. So, set your mic, seal those gaps, and enjoy your new, quiet studio hideaway—your recordings will thank you.