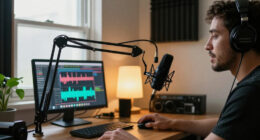
Set up a wireless studio microphone system by preparing the transmitter and receiver, choosing a clear radio channel, connecting the audio output, and checking the recorded signal. This guide is for beginners using a compatible wireless microphone, receiver, and studio recording setup. Allow 20–40 minutes, plus extra time if you need to coordinate frequencies with other wireless systems.

Get audio and creator gear delivered free with Prime
- Fast, free delivery on millions of items
- Prime Video, Amazon Music and more included
- Member-only deals all year

MAONO PD200W Hybrid Wireless Podcast Microphone for PC, Dynamic XLR USB Mic
- ✔ Connectivity: Wireless, USB, and XLR
- ✔ Capsule: 30 mm dynamic
- ✔ Pickup pattern: Cardioid

Audigo Wireless Microphone with Recording Studio App for iOS and Android
- ✔ Connectivity: Bluetooth and Wi-Fi
- ✔ Connector: USB Type-C
- ✔ Capture: 24-bit/48 kHz stereo
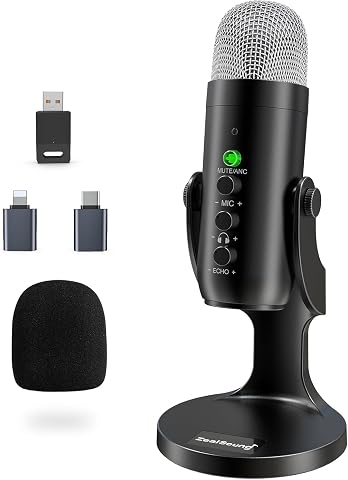
ZealSound K66 Wireless Microphone for PC, iPhone, iPad & Android with Noise Cancellation and Zero-Latency Monitoring
- ✔ Connectivity: 2.4GHz wireless and USB wired
- ✔ Pickup pattern: Cardioid
- ✔ Capture: 48 kHz
Difficulty: Beginner | Time: 20–40 minutes
What You’ll Need
Tools & Materials:
- Wireless microphone transmitter and compatible receiver
- Microphone capsule or lavalier, if not built into the transmitter
- Audio interface, mixer, or recorder with a suitable input
- Balanced XLR cable or the cable specified by the receiver manufacturer
- Fresh batteries or charged transmitter battery
- Headphones for monitoring
Knowledge:
- Basic ability to connect audio cables and select an input on a mixer or recording device
- Ability to follow the microphone system’s frequency and pairing instructions
Check that the transmitter and receiver belong to the same system and support the same frequency band. Local rules limit which radio frequencies you may use; consult the manufacturer’s regional frequency chart and your local regulator. Keep the system’s manual nearby because menu names and pairing steps differ by model.
MAONO PD200W Hybrid Wireless Podcast Microphone for PC, Dynamic XLR USB Mic
The MAONO PD200W is the best fit for a studio microphone that may need to work in more than one kind of recording chain. Its wireless receiver supports a desk-based setup, while USB and XLR connections leave room to connect directly to a computer or an audio interface. That flexibility gives it an edge over Audigo, whose most complete workflow centers on its mobile app, and ZealSound, which offers wireless and USB but not XLR.For podcast hosts, the option to use two microphones with one receiver can simplify a two-person recording arrangement. The dynamic capsule and cardioid pickup pattern make it a desk-oriented vocal choice, while the included stand and controls help keep the core setup together. The stated battery life and wireless range also make it suited to sessions away from a fixed cable run, though the actual setup depends on the compatible receiver and recording device.There are costs to this versatility in setup complexity. Beginners may need time to understand the app’s EQ and reverb controls, and camera or Lightning accessories for video synchronization are sold separately. Compared with ZealSound’s direct on-mic adjustment approach, MAONO asks us to manage more connection choices; compared with Audigo, it offers less emphasis on an all-in-one mobile editing studio.
Pros:
- Wireless, USB, and XLR connectivity support several studio configurations.
- Can support two microphones on one receiver for dual-host recording.
- Cardioid dynamic design is tailored to focused vocal use.
- Included desktop stand, receiver, and cables provide a ready starting setup.
Cons:
- Camera and Lightning accessories for video sync are sold separately.
- App-based EQ and reverb can add setup decisions for new users.
- The included desktop setup is less compact than Audigo’s pocket-sized design.
Best for: Podcast hosts and vocal creators who want wireless convenience now, with USB or XLR options for a changing studio setup.
Not ideal for: Buyers who want the smallest possible mobile microphone or a particularly simple, app-free workflow.
Bottom line: Choose the MAONO PD200W when connection flexibility and room to expand matter more than the simplest possible setup.
“Choose the MAONO PD200W when connection flexibility and room to expand matter more than the simplest possible setup.”
Audigo Wireless Microphone with Recording Studio App for iOS and Android
Audigo takes a different approach from the receiver-and-desk focus of the MAONO PD200W: it makes a compatible phone or tablet the center of the recording setup. Its pocket-sized body captures 24-bit/48 kHz stereo audio, and the companion app brings multitrack recording, editing, mixing, and effects into the same mobile workflow. For creators who want to make and shape a recording away from a computer, that integration is the main reason to choose it.Stereo capture and adjustable width offer a different kind of recording flexibility from the cardioid vocal focus of both MAONO and ZealSound. Audigo also lists multi-mic sync, a clipping check, and a magnetic base, features that may make it easier to place and coordinate in a compact content setup. Bluetooth and Wi-Fi connectivity help reduce the need for a separate receiver or cable during recording, but the phone remains central to the experience.That phone-first design is also the key compromise. The stated recording life is up to six hours, shorter than MAONO’s listed runtime, and advanced app features may require a paid subscription. Buyers who want hardware controls and monitoring without leaning on a companion app may find ZealSound more direct; those seeking a path to XLR studio gear should look to MAONO instead.
Pros:
- Pocket-sized design supports portable recording.
- Stereo capture with adjustable width suits more than close-miked speech.
- Mobile app combines multitrack recording, editing, mixing, and effects.
- Bluetooth and Wi-Fi connection avoids a separate receiver in the stated workflow.
Cons:
- Up to six hours of recording may not cover longer sessions without recharging.
- Advanced app functions may require a paid subscription.
- Full workflow depends on a compatible smartphone or tablet.
Best for: Mobile musicians, creators, and podcasters who want stereo capture and editing tools on a compatible phone or tablet.
Not ideal for: Long-session recorders who need extended battery life, or users who prefer a standalone microphone workflow without app dependence.
Bottom line: Pick Audigo when a compact, phone-centered recording and editing workflow is more important than long battery runtime or conventional studio connections.
“Pick Audigo when a compact, phone-centered recording and editing workflow is more important than long battery runtime or conventional studio connections.”
ZealSound K66 Wireless Microphone for PC, iPhone, iPad & Android with Noise Cancellation and Zero-Latency Monitoring
The ZealSound K66 keeps the recording path approachable: connect over 2.4GHz wireless or switch to its wired USB mode, then make adjustments at the microphone. Its on-mic gain, echo, and mute controls reduce the need to navigate software for common changes. That makes it a straightforward alternative to MAONO’s broader connection and app options, and a less app-dependent starting point than Audigo’s mobile studio workflow.For someone recording at a computer or using a compatible mobile device, zero-latency headphone monitoring is a practical advantage: it lets us hear the input while adjusting position or level. The supplied Lightning and USB-C adapters also support a range of listed devices, and the wired backup provides another way to connect if wireless is inconvenient. Its cardioid pickup and 48 kHz capture are aimed at focused voice recording for streaming, podcasting, and content creation.The feature list is useful, but buyers should consider how much processing they want. The noise reduction mode may change the natural vocal tone, so it may not suit every voice or recording style. Unlike Audigo, the K66 is not presented as a mobile multitrack editing studio; unlike MAONO, it does not list XLR connectivity or two-microphone receiver support. Its strengths are quick setup and direct control, rather than expansion into a more involved studio chain.
Pros:
- Plug-and-play wireless and USB wired modes suit different desk setups.
- Zero-latency headphone monitoring supports real-time adjustment.
- Gain, echo, and mute controls are available on the microphone.
- Adapters are included for Lightning and USB-C devices.
Cons:
- Noise reduction may alter the natural vocal tone.
- Wireless use requires battery management.
- Does not list XLR connectivity or the mobile multitrack app workflow offered by alternatives.
Best for: New streamers and podcasters who want a simple wireless mic, direct controls, and headphone monitoring across supported devices.
Not ideal for: Creators who need XLR expansion, two-microphone receiver support, stereo mobile production, or a fully natural vocal signal with noise reduction enabled.
Bottom line: Choose the K66 for accessible setup and hands-on controls when advanced routing and studio expansion are not priorities.
“Choose the K66 for accessible setup and hands-on controls when advanced routing and studio expansion are not priorities.”
As an Amazon Associate we earn from qualifying purchases.
Before You Start
Protect your equipment: Turn down or mute the mixer or interface input before connecting cables or switching on the transmitter. This helps prevent pops from reaching speakers or headphones. If other wireless microphones are operating nearby, note their channels and avoid choosing the same one.
Place the receiver where its antennas can stay upright and unobstructed. Keep it away from computers, Wi-Fi routers, metal enclosures, and other radio equipment when possible. Do not assume a channel is clear just because the receiver displays a frequency; use its scan function or the manufacturer’s recommended coordination method.
Step-by-Step Instructions
Step 1: Check the system and its frequency range
Read the labels on the transmitter and receiver and confirm that they are a matched set with a shared frequency band. Check that the band is allowed for use in your location. Attach the microphone capsule or lavalier as directed by the manufacturer, and inspect the connector for damage.
Tip:Do not force a connector or use a transmitter from a different system just because it fits. Some manufacturers use similar connectors with different wiring or power requirements.
Check: The transmitter and receiver power on, identify each other as compatible, and have no visibly damaged connectors.
Step 2: Prepare and position the receiver
Place the receiver on a stable surface near the mixer or interface. Position its antennas as shown in the manual, with a clear path toward the transmitter’s planned position. Keep antennas apart if the receiver has two, and avoid covering them with equipment or placing them inside a rack without suitable antenna connections.
Tip:For a diversity receiver, both antennas need a clear signal path; diversity does not remove the need for sensible placement.
Check: The receiver is powered, its antennas are connected and positioned, and its display is readable from your working position.
Step 3: Choose a clear channel
Turn on the receiver and run its channel scan or frequency coordination feature. If the system offers several clear channels, choose one that does not conflict with other microphones in use. For multiple wireless systems, coordinate all channels together using the manufacturer’s guidance rather than selecting each channel independently.
Tip:Run the scan at the studio location with nearby wireless equipment operating as it will during the session. Radio conditions can change between rooms and even after equipment is switched on.
Check: The receiver shows a selected channel or frequency, and its RF indicator remains steady or strong with the transmitter off.
Step 4: Sync the transmitter to the receiver
Insert fresh batteries or confirm the transmitter is charged. Set the transmitter’s input gain low before speaking, then use the receiver’s infrared sync, pairing menu, or manual channel setting to match it to the chosen frequency. Follow the model-specific instructions and keep the transmitter close to the receiver during syncing.
Tip:If the transmitter has a frequency lock, confirm the lock is off before changing settings, then turn it back on after the sync.
Check: With the transmitter on, the receiver’s RF indicator responds and shows a stable connection when you move the transmitter within the studio.
Step 5: Connect the receiver to the recording input
Keep the mixer or interface channel muted or turned down. Connect the receiver’s balanced XLR output to a microphone input, or use the output and input type specified in both manuals. If you use a line output, select a line input. Do not enable phantom power unless the receiver’s manual explicitly permits it.
Tip:Receiver outputs vary: some are microphone level and others are line level. Matching the output to the input prevents a signal that is too quiet or easily overloaded.
Check: The cable is secure at both ends, the correct input type is selected, and the channel remains muted until you are ready to set levels.
Step 6: Set gain and microphone placement
Unmute the channel, set the receiver output to its normal operating level, and speak or perform at the loudest expected volume. Adjust transmitter input gain first if the receiver shows clipping; then adjust the mixer or interface preamp so the meter peaks comfortably below 0 dBFS. Aim for peaks around −12 to −6 dBFS when recording in a typical digital setup. Place the microphone at the distance and angle recommended for its type.
Tip:Set levels while speaking at performance volume. A quiet test phrase can hide clipping that appears during a louder take.
Check: The recording meter moves clearly without reaching its maximum, and the receiver’s audio or peak indicator does not show overload.
Step 7: Monitor and record a test
Listen through headphones while speaking and moving through the area where you will record. Record 20–30 seconds of speech, then play it back and check for dropouts, hiss, distortion, handling noise, and room noise. Keep the receiver visible and watch both its RF and audio indicators during the test.
Tip:Test with the computer, lights, and other wireless devices in their normal session state. A quiet room with equipment switched off may not reveal interference that occurs during recording.
Check: The playback sounds clear and consistent, the meter remains below clipping, and the receiver shows a stable RF signal throughout the test.
Step 8: Secure settings for the session
Once the test passes, note the channel, transmitter gain, receiver output level, and mixer input setting. Lock the transmitter and receiver controls if the system offers a lock function. Confirm battery status and keep spare batteries or a charged backup transmitter nearby.
Tip:Mute the channel before changing channels or replacing a microphone capsule during a session.
Check: The system stays on the tested channel, the controls cannot be changed accidentally, and the transmitter has enough power for the planned recording.
Common Mistakes to Avoid
- Choosing a frequency without scanning or coordinating nearby systems. — Scan at the recording location with other wireless equipment active, and coordinate channels together when using multiple systems.
- Setting the gain while speaking softly. — Set transmitter and input gain while speaking or performing at the loudest expected level, then confirm that meters do not clip.
- Connecting a line-level receiver output to a microphone input without checking levels. — Check both manuals, select the correct input type, and lower the channel before unmuting.
- Putting the receiver behind metal equipment or far from the transmitter. — Keep antennas unobstructed and place the receiver where it has a clear path to the recording area.
Troubleshooting
Problem: The receiver shows no RF signal.
Solution: Check that the transmitter is powered, its batteries are good, and it is synced to the receiver’s channel. Move it closer and confirm that the selected frequency is permitted and correctly entered.
Problem: The signal drops out when the speaker moves.
Solution: Reposition the receiver and antennas for a clearer path, remove nearby obstructions, and rescan for a clearer frequency. Check whether the transmitter antenna is damaged or blocked by the speaker’s body.
Problem: The recording is distorted or clips.
Solution: Lower the transmitter input gain if the receiver indicates overload. Then lower the receiver output or recording preamp as needed, and repeat the loud-volume test.
Problem: The signal is noisy, hissy, or too quiet.
Solution: Check microphone placement and cable connections, then match the receiver output level to the selected input type. Raise gain only after confirming the transmitter is not clipping and the RF signal is stable.
What Success Looks Like
The transmitter remains connected throughout the recording area, the receiver’s RF indicator stays stable, and the recorded test plays back with clear audio and no dropouts or distortion. The recording meter peaks below 0 dBFS, and the channel, frequency, and gain settings are documented for the session.
Next Steps
Save the test recording and write down the system settings with the session notes. After recording, mute the channel before switching off the transmitter and receiver. Recharge the transmitter or replace used batteries, then store the microphone and cables safely. Rescan before a later session if the location, nearby wireless equipment, or local frequency conditions have changed.
Frequently Asked Questions
Can I use any wireless microphone with my receiver?
No. The transmitter and receiver need compatible frequency bands and system protocols. Check the manufacturer’s compatibility information before pairing equipment.
Should I use a microphone or line input?
Use the input that matches the receiver’s output level. Check the receiver and mixer or interface manuals; some receivers offer both microphone-level and line-level outputs.
Why does the receiver show RF but I hear no audio?
RF confirms a radio link, not necessarily an audio signal. Check that the microphone capsule is connected, the transmitter is unmuted, its input gain is raised, and the receiver output is connected to the selected recording input.
Do I need to scan again before every recording?
Scan when you move to a different location, add wireless systems, or notice interference. At a stable studio, check the channel and RF indicator before each session.